Friday, May 7, 2010

LESSON 4: TWO POINT PERSPECTIVE

Now that we've figure out how to put all our objects (facing us) on the same plane on our paper, we must figure out how to draw that same object if we were facing its side-corner.

In perspective drawing, every set of parallel lines has its own vanishing point. When viewing things in two-point perspective, we arrange them (or ourselves) so that we are looking at one corner, with two sets of parallel lines (the horizontals on the front and one side) are moving away from us, at an angle to a vanishing point. The remaining set of parallel lines, the verticals, are still straight up-and-down.


Here's a photograph of a box on a table. As with the one-point example, the line across the back is not the horizon line - it's the edge of the table, and is lower than my eye level, and so, lower than the horizon. If we continue the lines made by the edges of the box, they meet at two points above the table - at eye level.
Note the extra space I've had to add around the image to fit the vanishing points on the page - when you draw two-point perspective, close vanishing points make your image look compressed, as though through a wide-angle lens. For best results, use an extra-long ruler, and use wide paper from a roll, or tape extra sheets to each side. (You can also tape your drawing to the table, and place your vanishing points on a piece of tape placed out to the side.)


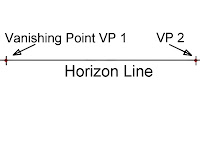
Let's draw a simple box using two-point perspective. First, draw a horizon line about one-third down your page. Place your vanishing points on the edges of your paper using a small dot or line.


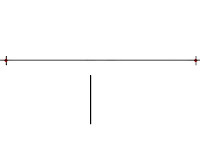
Now draw the front corner edge of your box, just a simple short line like this, leaving a space below the horizon line. Don't put it too close, or you'll end up with corners that are tricky to draw.


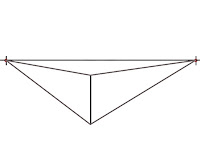
Now draw a line from each end of the line to both vanishing points, like this. Make sure they are straight, touch the very end of the line, and finish exactly at the vanishing point.


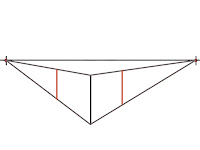
Now we complete the visible sides of the box by drawing the corners, shown here with red lines. Draw yours likewise, making sure they are nice and square, at perfect right angles to the horizon line. Not even a hint of a tilt!


This is the tricky part. Drawing the back, hidden sides of the box. You need to draw two sets of vanishing lines. One set goes from the right-hand corner line (top and bottom) to the LEFT VP (VP1). Another set goes from the left-hand corner line to the RIGHT VP (VP2). They cross over.
Make sure you don't try to make any lines meet, don't draw lines to any other corners, and don't worry about any of the other lines they might pass through. Just draw straight from the end of each back line to its opposing VP, as in the example above.
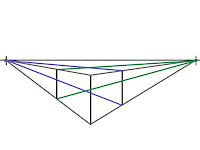


Now you simply have to draw a vertical line from the where the lower two vanishing lines cross, to the intersection of the upper two lines - the red line in the example. Sometimes this can be tricky - the slightest of errors can make them a little off center. If this happens, either start again making your drawing more accurate, or make a 'best fit', keeping your line vertical and fitting it between the corners as best you can. Don't just join the corners with a tilted line, as that will make the box misshapen.
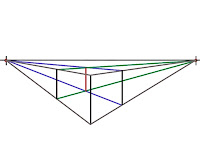

Finish off your two-point perspective box by erasing the excess vanishing lines. You can erase the lines of the box that would be hidden by they closer sides, or leave them visible if it is transparent. In this example, the top of the box is open, so you can see part of the back corner.
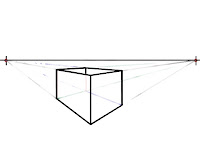


Here are a few more two point perspective examples. The steps are just the same as before, but the results look a little different depending on where you draw them.
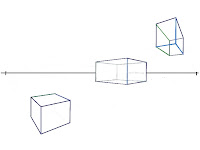


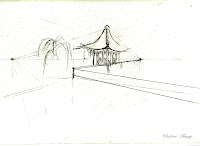
My study of Two Point Perspective at the Huntington Library
LESSON 3: ONE POINT PERSPECTIVE

One of the major issues my class had with our previous assignment was that our subjects seemed to float on the table. The inaccuracy of our previous study lies within our ignorance of perspective... which is the base of Jane Wu lesson today; One Point Perspective.

When all the object share the same perspective, you can lay them on the same plane to avoid "floating" objects.

ONE POINT PERSPECTIVE

In perspective drawing, every set of parallel lines has its own vanishing point.

To draw one-point perspective, we arrange our subject so that one set of lines has a vanishing point right in front of us, and the set at right-angles goes out to infinity on each side - parallel, either straight up or straight across. See the railway sleepers, how they stay parallel, straight across in front of us? And the fenceposts stay perpendicular (straight up-and-down). The railway lines and fence wire move away from us, to the one vanishing point in the distance.


Let's draw a simple box using one-point perspective. First, draw a horizon line about one-third down your page. Use a small dot or line to mark a spot roughly in the middle of the line. That's your vanishing point. (Don't make it as big as this example - you want it to be small, so that all your lines finish in exactly the same spot.)


Now draw square or rectangle, well below and to one side of your vanishing point. Make sure your vertical lines are perpendicular (at right angles) to your horizon line, and your horizontal lines are parallel. No funny angles or wobbly lines! For a successful perspective drawing, you need straight lines and corners that meet exactly.


Now draw a line from each corner of your square or rectangle to the vanishing point. Make sure they are straight and finish exactly at the vanishing point.


Now comes the tricky bit. Draw a horizontal line, starting a little way along the bottom left vanishing line, across until it joins the bottom right vanishing line. This is the bottom edge of the back of your box. Make sure it is straight - parallel to the horizon and front edge.
Now, draw two vertical lines, straight up, from where that back line meets the two vanishing lines, up to the two top vanishing lines. Then add the horizontal line that joins them.

The two biggest problems at this stage of the drawing are lines at angles - they must be straight - and lines that don't quite meet. If you stop short or go past the vanishing line ever so slightly, with one of the lines, you'll have trouble getting your last line straight.

If your box is close to the horizon or vanishing point, you might find that the angles are very obtuse (wide), and hard to get right.


Now you can erase the vanishing lines. You can keep all the lines inside the box if you want it to be see-through, like a fishtank, or, you can carefully erase the back corner - the bottom left, back, and lower back lines, as in the example.


Now try drawing some more squares and rectangles in different places. Try one above the horizon line, and one right in the middle below the vanishing point.


Draw the vanishing lines for your boxes. So long as your ruler is lined up correctly, you can stop drawing just short of the vanishing point, so that it is still easy to see, and not lost in a tangle of lines.


Finish off your single point perspective boxes. Try drawing a fishtank, an open box, and a solid box.


My Studies of Point Perspective at the Huntington Library


LESSON 2: OBSERVATION AND MEASURING

For this lesson, we were sat around a table with random small objects placed in close proximity and asked to draw them. We were given 30 minutes.
I didn't make finish in time and made a mess of things.
It wasn't a complete mess because I did learn from watching Jane Wu and figured out a few basic guidelines for my next attempt.


  1. The secret to working this assignment is to lightly block out (lightly sketch) the objects by using the basic shapes from Lesson 1.
  2. Concentrate on the general shapes without getting distracted by the details of each object.
  3. Use each object to approximate the size and location by comparing it with it's neighboring object.
  4. MEASURE

    • Grip the pencil in your fist leaving the thumb free.
    • Hold your arm out straight in a relaxed fashion with the thumb and pencil protruding straight up.
    • Close one eye and measure using one object as the basic reference size for all the other objects
    • Now hold that measurement from the top of the pencil to the thumb and line it up with the bottom of your last measurement.
    • Repeat this process and count how many reference object lengths make up the distance from the top of the other objects to the bottom.
    • Repeat this with the width, only turn your pencil to the side (90 degrees from the last orientation).

  5. Use your eye to see the negative space
    (the space around and between the subject(s) of an image. Negative space may be most evident when the space around a subject, and not the subject itself, forms an interesting or artistically relevant shape, and such space is occasionally used to artistic effect as the "real" subject of an image.)
  6. Frequently take a few steps away from your sketch board to compare what you have on paper versus what you see in the subject. Note what you have to adjust and what parts of your sketch is inaccurate.

LESSON 1: TRAINING THE ARM & BASIC SHAPES

In the attempt to break us of our habit of drawing with our wrists, Jane Wu had us repeating simple shapes on the paper in long smooth strokes with the grease pencil. We were to practice different amounts of pressure to apply to the paper as well as varying speeds and sizes covering the entire sheet of paper.

Our first shape: Circles
It took me a few tries to break the habit of drawing with my wrist. I had to imagine that I had a brace on and was forced to draw the my entire arm. It worked my shoulders.
Smooth perfect circles are tough. Without paying attention, the easily became ovals.
*The secret is to mime the motion of a circle a few times above the paper before actually making contact with the grease pencil to the newsprint,

Our second shape: Squares
The task was to practice long smooth strokes. We were asked to let the lines overlap each other in the corners so that we may discover a "follow through" through stroke.

Our third shape: Triangles
Again, we were encouraged to draw through the corners with overlapping lines.
The challenge in this exercise was to be able to balance drawing two angles and sides that matched each other to form an isosceles or equilateral triangle.

EVERYTHING in figure drawing consists of circles, squares or triangles. They are the essential, basic building blocks of art: BASIC SHAPES

DRAWING TOOLS


  1. Newsprint Sketch Book (18 x 24)
    Large recycled paper is ideal for studies (we're not creating master art, we're learning and practicing. Let's be conscious of the environment while we're at it). Force yourself to draw each study, covering the length or width of the paper. It trains you to use your arm in creating lines and breaks you from the habit of using your wrist.


  2. China Markers/ Grease Pencils
    The implement (the grease pencil) is smooth and easy to work with
    *NO ERASERS ( Erasing takes up too much time and keeps you from experiencing a complete education. We learn from our mistakes. Study them so that we can avoid them in future projects. We're not creating Master Art, we're learning and practicing)


  3. Sketch Board
    The sketch board is priceless in physically supporting your art when you at an upright tilted angle on your lap. Sketching from the ground or table is a poor idea that will warp your work/ study because of perspective.


  4. A Small Cardboard Box
    (size can vary from tissue box, cereal box to a fed ex box)

  5. A Tube
    (can use the inside of a paper towel or toilet paper roll)

  6. 2 Chairs
    (One chair to sit on. The other chair, facing you is used to partially prop your sketch board)

THE BEGINNING


I believe that it's inevitable that we find plateaus in our lives. Our first, knee jerk reaction is to panic.
After we settle ourselves, we attempt to ratiocinate our circumstance and find meaning or a temporary distraction in our lives.
I tend to use hobbies as effective distractions from pre-mid life crisis and have enriched my life with everything from learning new languages, volunteerism, martial arts to figure drawing.

Figure drawing stuck. It's become the most effective way to relieve stress in practice and challenge the brain in learning.

Figure drawing is an exercise in drawing the human body in its various shapes and positions.
"Life drawing" is the process of drawing the human figure from observation of a live model. I sincerely believe that this discipline is arguably the most difficult subject an artist commonly encounters. Every artists has some experience in figure drawing. I believe that it trains the eye to capture emotions and the details that create them in the realm of visual arts.

The human figure is one of the most enduring themes in the visual arts, and figure drawing can be applied to portraiture, fashion, cartooning and comic book illustration, sculpture, medical illustration, and other fields that use depictions of the human form. Figure drawing can be done very simply, as in gesture drawing, or in greater detail, using charcoal, pencil or other drawing tools.

In trying to grasp the once vague idea of what defines great figure drawing I researched.
My findings were superabundant.
I was especially inspired by the classical master and modern masters I'll share with my readers. I poured over hundreds of sketches, studies and interpretations to get a glimpse, a sliver of understand of what makes the magic... the x-factor in theses works of art and why our natural instinct is to be attracted to their work.

A list of a few my favorites:

The Classical Masters:

  • Leonardo Davinci
    (his skill at representing human physiognomy, and how expressions and gestures reflect emotion, and his use of sfumato to create subtle shading, are what makes him my number one)
  • Michelangelo Buonarroti
    (responsible for possibly the most spectacular and influential of all figure paintings in the history of art)
  • Matthias Grunewald
    (his devotional altarpieces set new standards in the depiction of the human body.)
  • Carravagio
    (My favorite revolutionary naturalist painter and one of the founding members of the Baroque school of art. Best known for his portrayal of biblical characters as ordinary everyday people)


Modern Favorites:

  • Peter Paul Rubens
  • JS Sargent
  • Rembrandt Harmenszoon van Rijn
  • Sarah Purser


I researched the sketchbooks and studies of these Masters. I found magic in form, expression, lines, mood, value.

In the world of fashion illustration I was also able to explore a treasure trove of exaggerated gestures and tone.

Fashion Designers who worshipped human form

  • Christian Dior
  • Givenchy
  • Yves Saint Laurent
  • Valentino
  • Gaultier
  • Christian Lacroix
  • Versace
  • Karl Lagerfeld


I'm amazed at how each of these artists deliver a spellbinding impression of the human form in my mind as I reviewed their greatest works.
How one captures a three dimensional, living, breathing, animated, flawed, organic, original subject and transform their highest essence on a 2D plane is magic.

Let Us Explore!